· Registering to the Application
· Dial 112
· SOS Help!
o Viewing and Adding Information to Incidents
· Options
o Settings
o FAQ
o Help
CG Dial 112, a mobile application is specifically designed to cater to the emergency needs of citizens in a distress situation. The simple and easy to use interface of the application enables citizens to use it with minimal efforts. It provides multiple options to the citizens to notify the responding agencies during distress situations using SOS (Emergency Help), Dial 112 and Create Incident. A single touch on the application in any distress situation ensures immediate and direct notification to the required agency. By using SOS option, the citizen's current location, audio, video, mobile battery level and mobile signal level information is shared with agency for prompt help. The one touch Dial 112 initiates a voice call to the Dial 112 Control Room and triggers a real time location tracking of the caller during an active call. Create Incident is a interface to share real time incident details along with audio or video for enhanced situational awareness. Thus, mobile app assures a swift and prompt action by required agency to extend their instant help toward citizens.
After downloading the CG Dial 112 application from Mobile Operating System store (Android and iOS) or Agency Citizen Portal, you have to register by sharing your personal details.
![]() Note: If there is * next to any field, it
indicates that it is a mandatory field.
Note: If there is * next to any field, it
indicates that it is a mandatory field.
Once the CG Dial 112 application is downloaded and installed on your mobile, you need to follow the following steps to register:
1.
After installation, the application icon  appears in your
mobile.
appears in your
mobile.
2. Tap the Application icon. The Splash screen of the application is displayed.
![]() Note: Internet connection is mandatory to
initiate the registration procedure.
Note: Internet connection is mandatory to
initiate the registration procedure.
3. After splash screen, the screen to generate a PIN is displayed.
![]() Note: In case of a dual or multiple SIM cards, ensure
that your default calling number is registered. If you change your default
calling number then you have to re-register to the application.
Note: In case of a dual or multiple SIM cards, ensure
that your default calling number is registered. If you change your default
calling number then you have to re-register to the application.
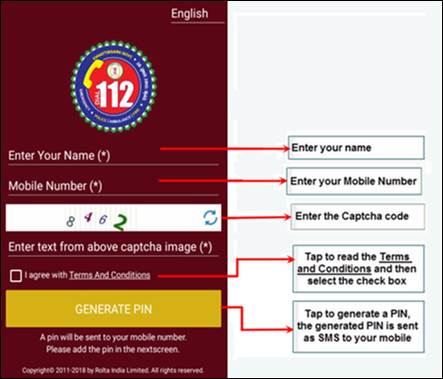
To register, follow the steps as shown in image below:
4. The next screen to enter the PIN is displayed.
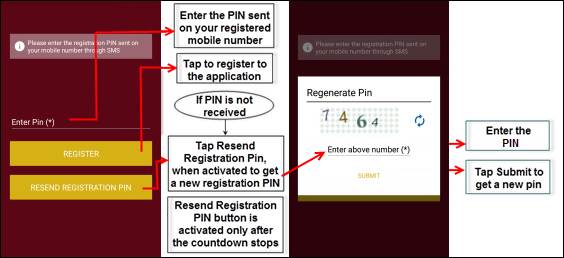
5. As you enter the received PIN, the home screen of the application is displayed.

![]() Note: If GPS and Internet is off, then you will
get messages as follows at the bottom of the screen to tap and turn on GPS and
internet.
Note: If GPS and Internet is off, then you will
get messages as follows at the bottom of the screen to tap and turn on GPS and
internet.
![]()
![]()
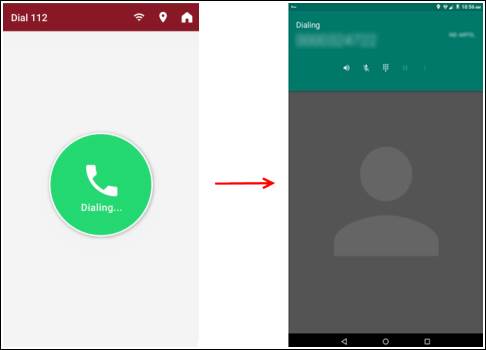
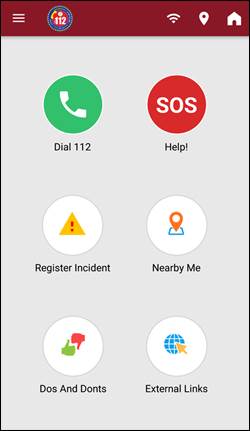
You can initiate a voice call for assistance to Agency in case of general complaints. You need to just tap the CG Dial 112 icon, which lands you directly to the CG Dial 112 home screen. From the home screen, you can tap Dial 112 icon to initiate the voice call. To initiate a call, perform the following steps:
1. Tap CG Dial 112 icon to open the CG Dial 112 home screen.

2.
Tap Dial 112 icon ![]() . The call is routed to Agency
Control Room.
. The call is routed to Agency
Control Room.
![]() Note: If GPS is off, then the mobile settings page
is opened where you can turn GPS on.
Note: If GPS is off, then the mobile settings page
is opened where you can turn GPS on.
![]() Note: When you are on call with the Agency
Control Room, you cannot navigate to any other page than the Dial 112 on the CG
Dial 112 Application.
Note: When you are on call with the Agency
Control Room, you cannot navigate to any other page than the Dial 112 on the CG
Dial 112 Application.
3. Along with the call an SMS will be sent containing details, such as mobile number, location details, date and time.
![]() Note: Even if you do not activate the Internet
service, your call will be relayed to Agency Control Room without sending your location
details.
Note: Even if you do not activate the Internet
service, your call will be relayed to Agency Control Room without sending your location
details.
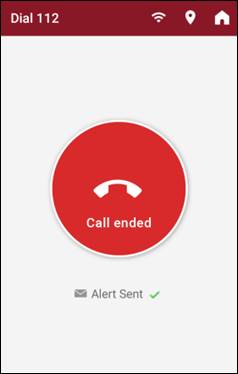
4.
After you end the call with the Agency Control Room, tap Call ended
icon  on the Dial 112 page. An
SMS will be sent to the Agency Control Room containing details, such as mobile
number, location details, date and time.
on the Dial 112 page. An
SMS will be sent to the Agency Control Room containing details, such as mobile
number, location details, date and time.
You can initiate an alert for assistance to Agency in an emergency situation. You need to just tap the CG Dial 112 icon, which lands you directly to the CG Dial 112 home screen. From the home screen, you can tap SOS icon to initiate the alert. To initiate an alert, perform the following steps:
1. Tap CG Dial 112 icon to open the CG Dial 112 home screen.
2.
Tap SOS icon ![]() to raise emergency alert to the
Agency.
to raise emergency alert to the
Agency.
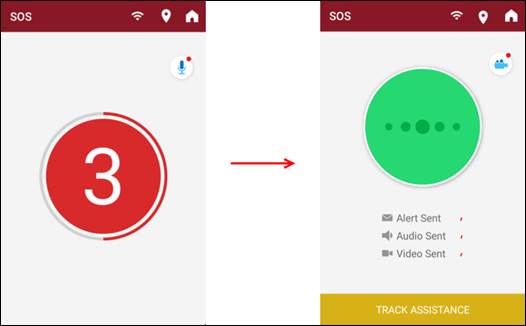
3.
Your current location and recorded audio and video are sent as an alert
to the Control Center as per the Alert settings that you have already
defined. For more information about alert settings, refer section Changing Alert settings.
![]() Note: If the audio and video recording setting is
on, then the Agency will get the recorded audio and video for first 10 seconds
after you tap SOS.
Note: If the audio and video recording setting is
on, then the Agency will get the recorded audio and video for first 10 seconds
after you tap SOS.
![]() Note: If you have already added Guardians, then
an SMS alert will be sent to them when you tap SOS icon and when you the
alert is ended. Even if, GPRS is off an SMS is sent to the Control Center when
you tap SOS icon and when the alert is ended. Even if, you do not
activate the GPS and Internet services, your call will be relayed to Control
Center without sending your location details.
Note: If you have already added Guardians, then
an SMS alert will be sent to them when you tap SOS icon and when you the
alert is ended. Even if, GPRS is off an SMS is sent to the Control Center when
you tap SOS icon and when the alert is ended. Even if, you do not
activate the GPS and Internet services, your call will be relayed to Control
Center without sending your location details.
4. You can track the position of assistance that is sent for you, by taping TRACK ASSISTANCE.
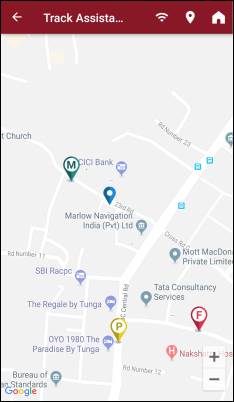
![]() Note:
.
Note:
. ![]() icon indicates Police,
icon indicates Police, ![]() icon
indicates Medical help and
icon
indicates Medical help and ![]() icon indicates Fire station.
icon indicates Fire station.
5.
Tap the icon to get contact details.
Using CG Dial 112 App citizens can report incidents. Citizens can also view, add comment, search and check status of reported incidents.
Creating Incidents
To create an incident
1.
Tap Register Incident icon  on the Home screen. The Register
Incident screen is displayed.
on the Home screen. The Register
Incident screen is displayed.
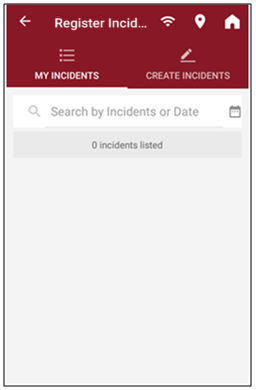
2. Tap Create Incidents tab to create a new incident. The Create Incidents tab is displayed.
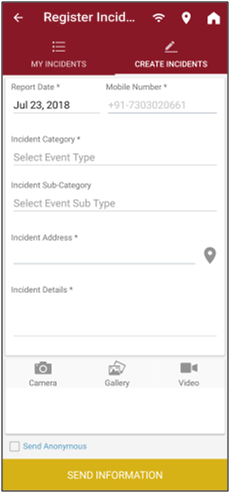
3. In the Report Date field, enter the date of the incident. You can also select the date from the calendar.
4. In the Incident Category and Incident Sub-category fields, select category and sub category.
5.
In the Incident Address field, enter the address where the
incident took place. You can also select the address from the map by tapping on
![]() and placing it on the map.
and placing it on the map.
6. In the Incident Details field, enter description of the incident.
7. To upload images, videos and any other additional document, tap Camera, Gallery and Video as per your requirement. These fields are optional.

Note: If you want to send the incident without disclosing your identity,
then tap to select the Send Anonymous checkbox. This field is optional.
8. Tap SEND INFORMATION to send incident information to Control Center.
9. The Incident created successfully message appears.
Viewing and Adding Information to Incidents
10. Tap
Register Incident icon  on the Home screen. The Register
Incident screen is displayed.
on the Home screen. The Register
Incident screen is displayed.
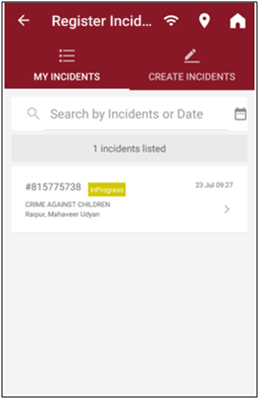
11. Tap the incident that you want to view. The incident details, such as report date, close date (if applicable), category, description, attachments, and location on map are displayed.
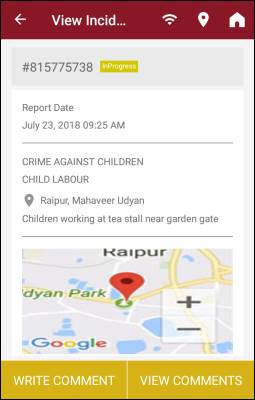
12. Tap VIEW COMMENTS to view the existing comments.
13. Tap WRITE COMMENT to add your comment. The Comments screen is displayed.
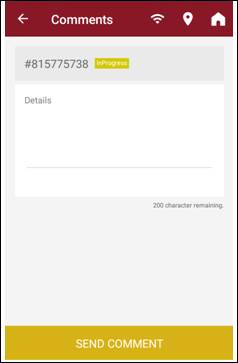
14. Enter comment in the Details field to reply to the existing comment or to provide additional details and tap SEND COMMENT.
Searching Incidents
To search by using incident number
· In the Search field at the top of the screen, enter the incident number. The incident is displayed in the search result.
To search by using date
· In the Search field at the top of the screen, enter the date of the incident or select a date using the calendar. All the incidents that took place on that date are displayed in the search result.
1.
Tap the Nearby Me icon  . The Nearby
Me page is displayed.
. The Nearby
Me page is displayed.
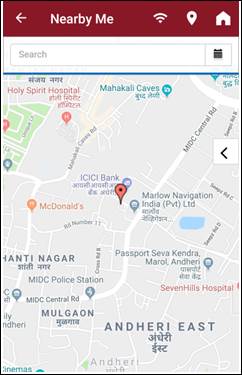
2. Type the address you want to search in the Search box at the top. From the search results select the address you are searching for.
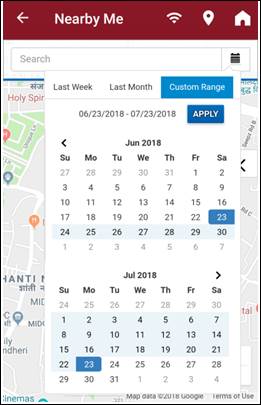
3.
Tap![]() icon and select date range from
Last Week, Last Month or Custom Range.
icon and select date range from
Last Week, Last Month or Custom Range.
Note: If you select Custom Range, then you need to select first
and last date from the calendar and tap APPLY.
4. When the crime locations for the selected date range are displayed on the map, zoom out to see all the crimes in your area.
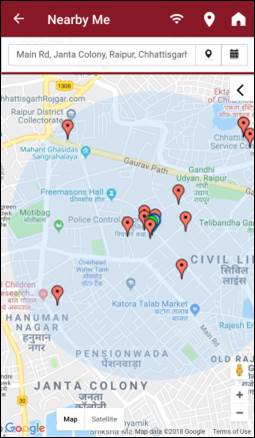
5.
To view crime details, tap ![]() and see the
following area:
and see the
following area:
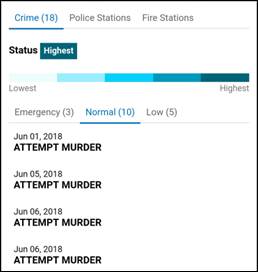
6. For current status of crime in the area you searched for, see Status.
7. Tap Emergency, Highest, Higher, Normal, High and Low tabs, to see the list of crimes with priority as emergency, highest, higher, normal, high and low.
8. Tap the Police Stations and Fire Stations tabs to check Police and Fire Station numbers for the area you searched for.
The Do’s and Don’ts for safety and security of citizens at their residence and office and also during travel are provided.
On the Home screen, tap the Do’s And Don’ts icon  to view the do's and don'ts for
safety and security of citizens.
to view the do's and don'ts for
safety and security of citizens.
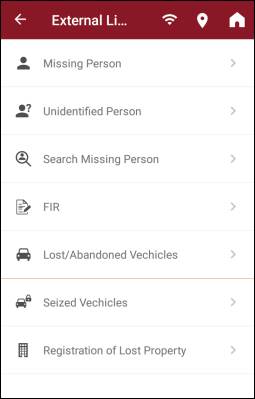
External Links section provides links to external sites of Chhattisgarh police, such as Missing Person, Unidentified Person, Search Missing Person, FIR, Lost/Abandoned Vehicles, Seized Vehicles and Registration of Lost Property. Some sites are not yet added in the CG Dial 112 App and you may get the coming soon message when you tap on one of the options provided.
The Option menu ![]() available on
the top right corner of the home screen has the following options; however it
may appear differently for different mobile devices:
available on
the top right corner of the home screen has the following options; however it
may appear differently for different mobile devices:
· Settings
· FAQ
· Help
Viewing About CG Dial 112
The About CG Dial 112 menu provides the links to access detailed information about the Credits and Acknowledgement and the End User License Agreement. To view the About CG Dial 112 screen, follow the steps below:
1. Tap the Option menu.
2. Select the About CG Dial 112 option, the About CG Dial 112 screen is displayed.
Changing Settings
There are a number of settings that you can configure in this application, such as adding your personal, medical and guardian details. It also allows you to set the alert setting, which helps you in choosing the media files that you would like to send to the concerned agency and your registered guardians at the time of emergency. You can add a maximum of three guardians and their contact details, which are intimated when you are in an impending situation. The multilingual facility allows you to change the interface of the application to your required selected language.
The settings option allows you to navigate to the following four features:
· Personal
· Medical
· Guardian
· Alert
Adding Personal Details
You can add personal, medical and guardian information.
Personal Information
The personal details option allows you to enter your profile picture. You can add other details such as, your alternate number, e-mail id, address and language.
To add personal information
1. Tap the Option menu.
2. Select the Settings option, the Settings screen is displayed.
3.
Tap the Personal option, the Personal Information screen
is displayed.
Note: The Name and Phone Number fields are auto populated
with the name and phone number you provided during registration.
4. To add or modify personal information, follow the steps as shown in image below:
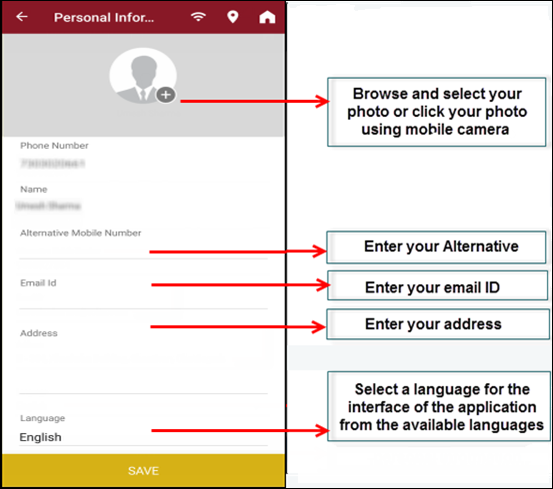
Note: Adding photo, Alternate Mobile Number, Email ID and Address
are optional fields.
5. Tap SAVE to save personal information.
Medical Information
The medical details option allows you to enter vital information such as blood group, and other health related information which can be utilized in case of an emergency.
To add medical information
1. Tap the Option menu.
2. Select the Settings option, the Settings screen is displayed.
3. Tap the Medical option, the Medical Information screen is displayed.
4. To add or modify personal information, follow the steps as shown in image below:
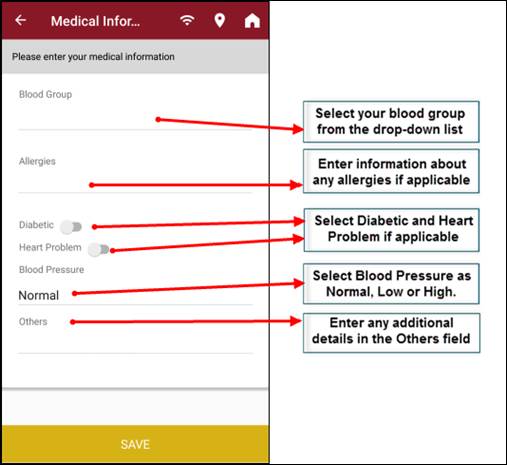
5. Tap SAVE to save personal information.
Guardian Information
You can enter the guardian’s details, such as name, mobile number and e-mail ID. As you save the contact details of your guardian or friend, an acknowledgement SMS or E-mail is sent to the respective registered guardians intimating them that they have been added as your guardian.
To add guardian information
1. Tap the Option menu.
2. Select the Settings option, the Settings screen is displayed.
3. Tap the Guardian option, the Guardian Information screen is displayed.
4. Tap ADD NEW GUARDIAN, the page to add guardian details is displayed.
5. To add or modify guardian information, follow the steps as shown in image below:
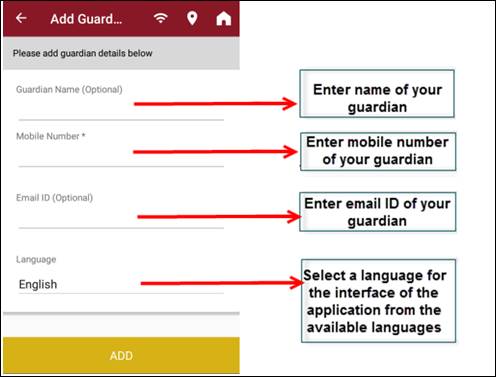
Note: Guardian Name and Email ID are optional fields.
6. Tap SAVE to save guardian information.
To modify guardian information
1. Tap the Option menu.
2. Select the Settings option, the Settings screen is displayed.
3. Tap the Guardian option, the Guardian Information screen is displayed.
4. Tap the Guardian name that you want to modify or delete.
5. To modify the information, edit the required fields and Tap SAVE.
To delete guardian information
1. Tap the Option menu.
2. Select the Settings option, the Settings screen is displayed.
3. Tap the Guardian option, the Guardian Information screen is displayed.
4. Tap the Guardian name that you want to delete.
5. Tap DELETE to delete the Guardian.
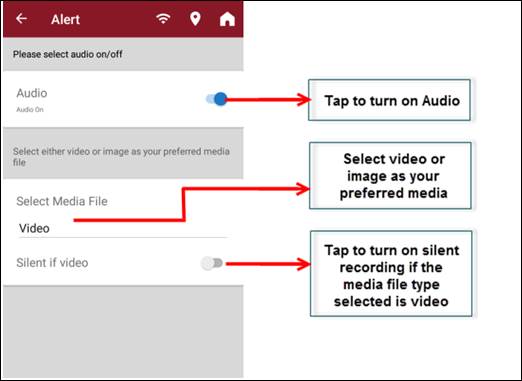
Changing Alert settings
This feature allows you to select any one media file from the
available options of video or image. Based on your selection, the video or
image will be sent to the concerned agency and registered contacts along with a
default audio file when you tap the SOS  icon.
icon.
If Video is selected as one of the media files, then as an emergency alert is created, automatically a video recording starts. However, video recording can be done in either silent or normal mode. For Silent mode you need to select the Silent check box, which captures video passively without previewing what it is capturing. Instead, a blinking icon appears at the top right side of the home screen for the pre-decided duration, indicating that recording is taking place. If Silent check box is left unchecked then you will be able to view the live capturing of your video recording and you can stop video recording any time you want to.
To change alert settings
1. Tap the Option menu.
2. Select the Settings option, the Settings screen is displayed.
3. Tap the Alert option under General Settings, the Alert screen is displayed.
4. To change alert settings, follow the steps as shown in image below:
5. Tap SAVE to save alert settings.
Sending Feedback
The Sending Feedback feature allows you to attach a feedback on the application based upon your experience. You can take the screenshot of the required screen, save and attach it and add your suggestion or comment on the required feature and submit it.
To give feedback
1. Tap the Option menu.
2. Select the Send Feedback option, the Send Feedback screen is displayed.
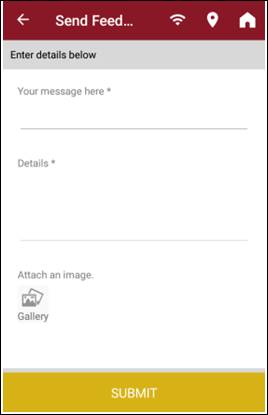
1. Enter your feedback or suggestion in the Your message here field.
2. Enter additional information in the Details field.
3. Tap
![]() and navigate to the location
where the feedback file is stored.
and navigate to the location
where the feedback file is stored.
4. Select
the appropriate file and tap OK.
Note: For giving feedback, attachment of the file is optional.
5. Tap Submit. The feedback or suggestion is submitted.
Viewing FAQ
The Frequently Asked Questions (FAQ) menu provides you the answers to the most commonly asked questions. To read FAQ, tap Option > FAQ.
Viewing Help
The Help menu lets you access a detailed step by step help document that will assist you to use the CG Dial 112 application on your mobile. To view the Help, tap Option >Help.
Unregistering an Account
The unregister feature allows you to unregister or delete your account from the application. However, you can re-register to re-activate the facility on your mobile. To unregister, follow the steps below:
1. Tap the Option menu.
2. Select the Unregister Account option, the Confirmation dialog box is displayed.
3. Tap Yes to confirm that you want to unregister.